
In this article, we will provide easy-to-understand instructions on how to install Sakurabook.
Last month, in January 2020, the Sakurabook renewal version was officially released. We would like to thank our European and American customers for using our service. We have received a variety of feedback, but a large number of requests include ``I would like you to provide easy-to-understand instructions on how to install the system.''
Therefore, this time I would like to introduce the flow from installing Sakurabook to setting up a reservation calendar in an easy-to-understand manner.
Flow from introduction (installation) of Sakurabook to reservation calendar installation
-
Preparation for implementation:Prepare your Shopify product page as a reservation service. Create the content you want to provide as a reservation service as a "product page" in Shopify, set the tag "service" and link it to Sakurabook.
-
Installing Sakurabook:Search for Sakurabook from the Shopify app store and install it. After installation, Sakurabook's admin console opens and Sakurabook appears in the Apps section of your Shopify admin page.
-
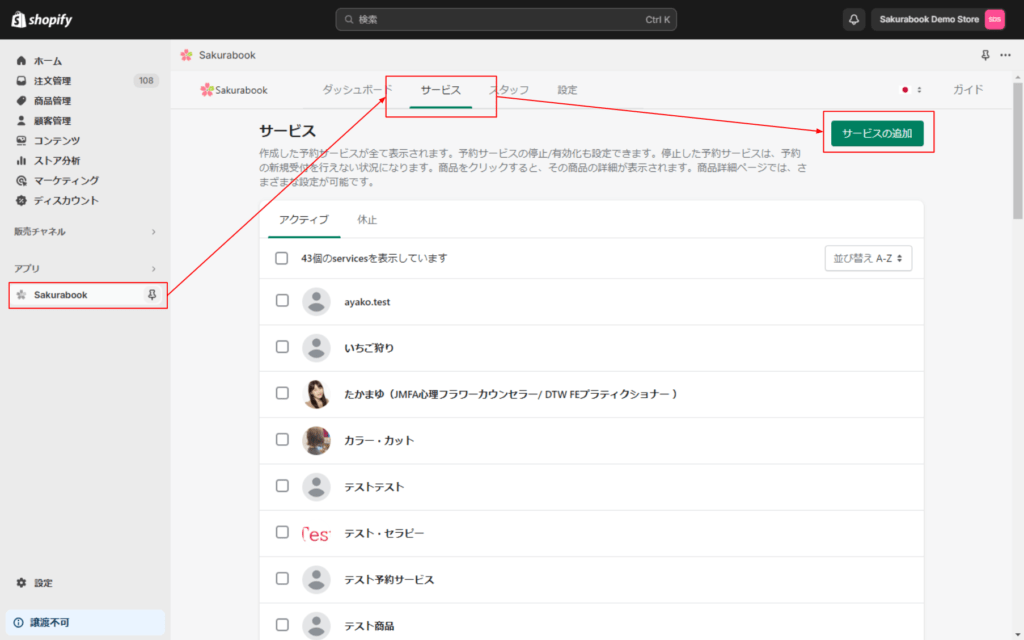
Addition of reservation service:Click the "Service" tab on the Sakurabook management screen and add the product page with the "service" tag as a reservation service from the "Add service" button.
-
Staff registration and settings:Add staff from the Staff tab and set their details, working hours, assigned services, and more.
-
Detailed settings for reservation service:For each reservation service, set details such as staff, business hours, preparation time, store location, video conferencing settings (if required), and length of reservation time.
-
Installation of reservation wizard:Use Shopify's theme customization feature to install a reservation wizard (reservation calendar) on your product page. The reservation wizard is a block that includes a staff nomination menu, availability calendar, reservation time specification, etc.
Let's take a closer look at each of the above steps.
1. Preparing to install Sakurabook: What to do before installation
That is the first step. We will guide you through the preparation for installing Sakurabook.
You can use Sakurabook by installing it from the Shopify app store without making any preparations, but the installation will be smoother if you make some preparations in advance. I will explain this advance preparation.
⇒ Preparation for introducing Sakurabook
Creating and configuring product pages
First, create a product page.
- Create the reservation service you want to offer as a "product page" in Shopify. "Product" here means the actual service provided.
Set up the product page as follows.
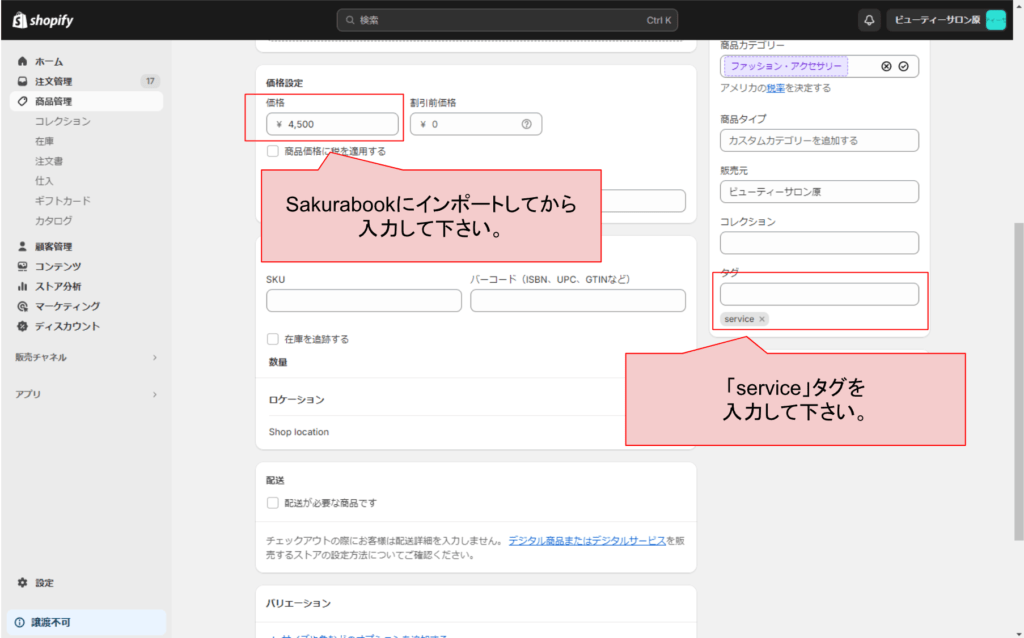
- Pricing: Set the fees for providing the service. When registering with Sakurabook, the price settings will be reset to 0 yen, so you will need to reset them later.
- Tag item: Set the tag "service" on the product page. This tag allows Sakurabook to recognize the page as a reservation service and import (add) it.
[Note: Regarding creation of variations and collections]
Sakurabook does not support the "variation" function on product pages. Therefore, if you want to offer different variations (e.g. different hours or service content), we recommend creating separate product pages for each and organizing them using Shopify's "Collections" feature.
2.Installing Sakurabook
After completing the installation preparations, install Sakurabook.
Search for Sakurabook from the Shopify app store and add (install) the app. After installation is complete, the Sakurabook admin screen will automatically open and Sakurabook will appear in the Apps section of your Shopify admin page.

3.Addition of reservation service
After installing Sakurabook, add the reservation service. By importing the product page created earlier in advance preparation into Sakurabook. You can post it as a reservation service.
The steps to import the product page to Sakurabook are also shown in the tutorial that is displayed immediately after installing Sakurabook. If you have created a product page in advance, follow the on-screen instructions during this tutorial step. Also, you can add any product page later without adding it in the post-installation tutorial.
When you click the Add Service button from the Service tab of Sakurabook, product pages with the "service" tag will be listed. From there, you can specify and load any product page.
⇒Addition of reservation service | Sakurabook User Guide
4. Staff registration and detailed settings
Next, register your staff in Sakurabook and make detailed settings. Sakurabook has a system where you register not only the reservation service but also the staff in charge of it. This not only allows customers to reserve a service by designating a designated staff member, but also allows them to make reservations at a time when, for example, there is a vacant reservation slot for a service, but there is no staff member available to handle the service, so the service cannot be provided. You can prevent reservations from being made by mistake when this happens.
Now, let's walk you through the steps to register your staff on Sakurabook and set their details.
⇒Staff registration and detailed settings | Sakurabook User Guide
The steps to register staff in Sakurabook and configure detailed settings are as follows.
-
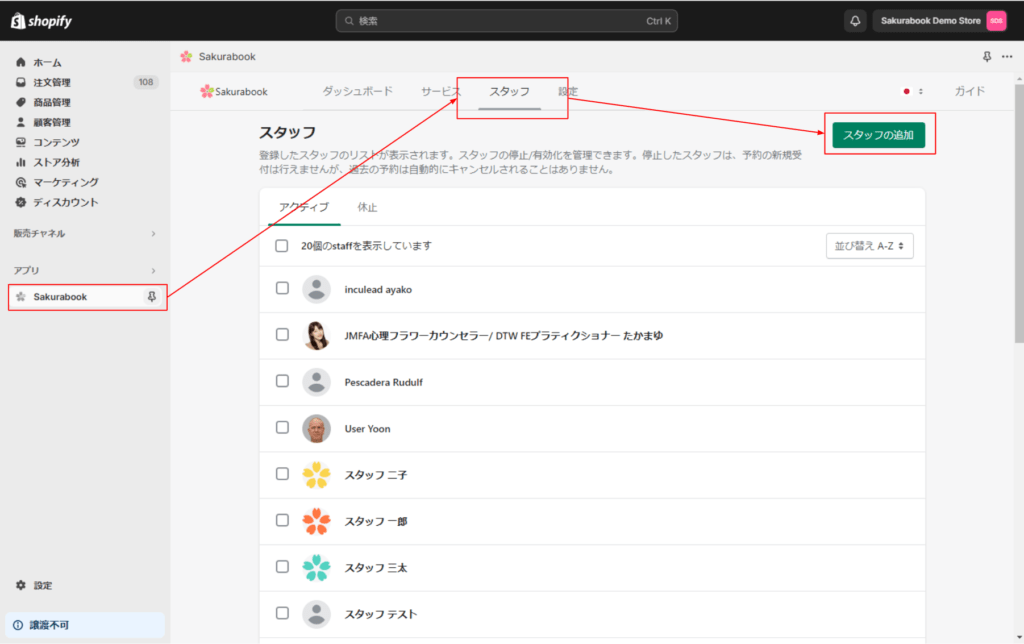
Add staff:
- Open the "Staff" tab on the Sakurabook management screen.
- Click the Add Staff button.
- Enter your staff details (name, email, phone number, profile, etc.) and save.
-
Edit staff registration information:
- Open the list of registered staff from the "Staff" tab.
- Click the name of the staff member you want to edit.
- Update the staff details and save again.
Staff details include the following information:
- Basic information: staff name, email, phone number, profile, etc.
- Assigned Services: Assign services for staff members. This is done by clicking the Add Service button and selecting from the list.
- Calendar: A calendar that displays the staff's reservation acceptance status.
- Working hours: Set staff working hours for each day of the week. Working hours are also used to calculate available time slots.
After completing the detailed settings, click the "Save" button to save the contents.
5.Detailed settings for reservation service
Next, make detailed settings for the reservation service.
We have imported the product page that we created earlier as a reservation service into Sakurabook, but after importing it, we will make more detailed settings.
⇒Detailed settings for reservation service
The detailed settings for the reservation service registered in Sakurabook are as follows:
-
Open the detailed settings screen for the reservation service:
- From the Sakurabook management screen, click the "Services" tab.
- From the list of reservation services added to Sakurabook, click the name of the service you want to configure detailed settings for.
-
Reservation service detailed settings items:
- Setting staff in charge: Set the staff in charge of providing reservation services. It is possible to add multiple staff members.
- Business Hours: Set the available business hours for reservation services. Reservations can only be made within this time.
- Preparation time: Set preparation time before and after service provision. Reservations are not possible during this time.
- Store Location: If the service is provided in a store, enter the store address.
- Video conferencing: Set up the use of video conferencing when providing services online.
- Booking length: Set the amount of time it takes to provide the booking service.
- Additional Settings (Cancellation Policy Deadline): Set the deadline by which reservations can be canceled.
-
Save advanced settings:
- After adding or changing advanced settings, click the Save button to save your changes.
6. Installation of reservation wizard
Next, we will guide you through the steps to post Sakurabook's reservation wizard (reservation calendar) on your site. Let's change the template of the product page imported as a reservation service and install the Sakura Book reservation wizard. The steps are as follows:
⇒ Installation of reservation wizard | Sakurabook usage guide
-
Open Shopify's theme customization feature:
- From the left menu of your Shopify admin screen, click Sales Channels, then select Online Store.
- When the "Theme" screen appears, click the "Customize" button to open the theme customization screen.
-
Select the product page on which you would like to place the reservation wizard:
- Select the "Products" page from the dropdown menu at the top of the screen to open the customization screen for the product page you want to edit.
-
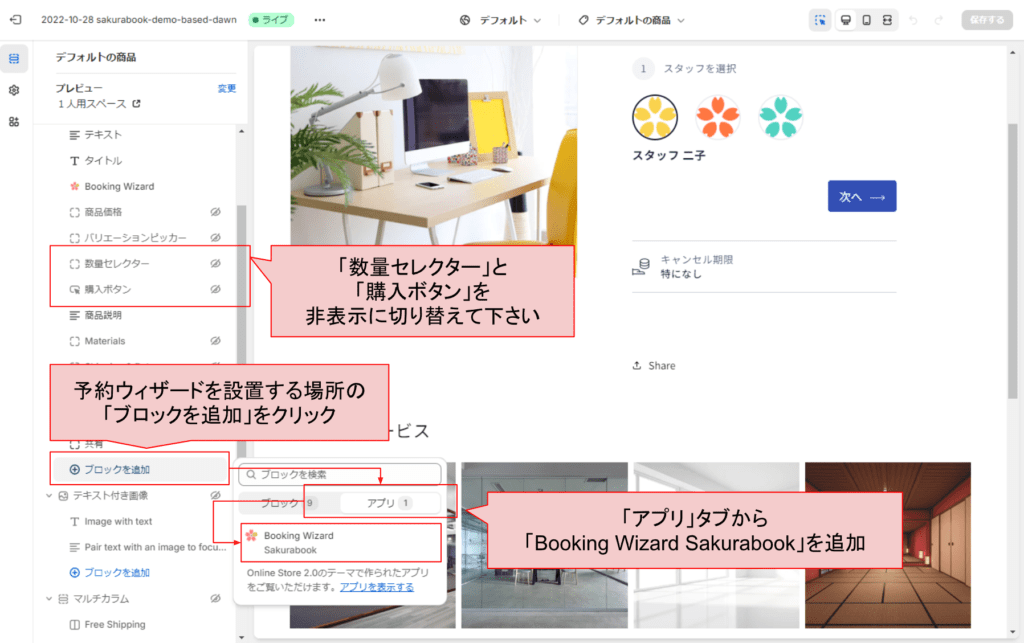
Hide the "Buy Button" and "Quantity Selector":
- On the product page customization screen, hide the "Purchase Button" and "Quantity Selector" items from the left menu.
-
Add app block for Reservation Wizard (Reservation Calendar):
- From the left menu, select "Add Block" where you want to place the Booking Wizard, then select and add "Booking Wizard Sakurabook" from the "Apps" section.
-
Save your changes:
- Click the Save button in the top right corner of the screen to save your theme changes.
We provide Sakurabook introduction and installation services.
The steps to add Sakurabook to your Shopify site may seem complicated at first glance, but if you're used to customizing Shopify sites, you can set it up in about 30 to 40 minutes. But on the other hand. If you are not familiar with Shopify, you may find some parts of this process difficult, as it involves some complicated tasks such as customizing the product page template. Also, if there are a large number of reservation services or staff registered, the registration process may become difficult.
Therefore, at our company,Sakurabook installation and installation serviceWe have decided to offer a new one.
As a development company, we will provide thorough support so that you can use Sakurabook without hesitation, including not only installation and initial settings, but also lectures on how to operate it afterwards.
Please check the page below for details and how to apply.